Sunday, October 3, 2010

Human Campaign: Map 10

Remember how easy the 10th orc mission was? You could send all your units to the human base and win the mission. If you try that here, your forces will be ripped apart by enemy spell casters. Warlocks love to blanket the screen with poison clouds, shredding your units to pieces. The necrolytes will cast unholy armor on raiders, making them invincible. Basically, the only way to win this mission is through extreme micromanagement. But if you take too long trying to set up formations, the enemy will send waves of spiders.

A brave army facing uncertain doom.

Here's your starting location. While your army looks impressive now, you'll definitely lose about 90% of them by the end. The first thing you should do is reduce the game speed.

Expendable scorpions.

Send scorpions to scout the map. Your conjurers should have enough mana to summon one each. The scorpions will run into some orcs and get killed. You should also use the cleric's far seeing spell to uncover the orc town to the west.

Attack, attack!

Move your entire army to the center of the map, just across from the bridge that leads into the orc town. Don't attack right away. The warlocks will blanket the bridge with poison clouds and wipe out your army. Instead, send scorpions into their base to make the warlocks waste their mana. If this doesn't work, set up a wall of archers flanked by catapults. The warlocks will eventually summon spiders.

If you're lucky, your army will reach the temple intact.

As you send your army across the bridge and into the orc base, you'll want to keep a tight formation: knights in front, clerics in the back. Keep healing the front line. As soon as you see a necrolyte cast unholy armor on a raider, redirect your knights to kill a different enemy. The worst thing you can do here is have your units attacking invincible units while the rest of your army gets torn apart by poison clouds. If the warlocks summon more poison clouds over the bridge, immediately tell your units to stop moving.

Keep summoning scorpions to keep the pressure on!

The best way to kill necrolytes and warlocks is to use catapults. The splash damage is very effective. With a bit of luck, you'll have a few units left to mop up the town. It took me about 4-5 tries to finally complete this mission.

Next Time: On to the twin cities of Rockard and Stonard

Human Campaign: Map 9

You're tasked with destroying two orc towns who thankfully do not defend one another. The geography is your friend. Both towns are situated across the river and there's only one entrance into your base. If you can hold the bridge that separates the western half of the map from the eastern half, you can focus your energies on building your army.

Here is your starting location. Don't be scared of the shroud. The orcs will only attack from the north. So move all of your units north.

Into the swamps we go.

There are two mines on your side of the river. The closest one is to the southeast. You shouldn't need more than two mines to complete the mission.

Here's the closest mine.
Guard the town with your starting units.

As you explore north, you may want to move your units to the bridge.

Prepare for the inevitable poison cloud attacks.

Meanwhile, when building your town, you'll want to make sure you leave a lot of open space between your buildings. The reason for this is to avoid taking too much damage from poison cloud attacks.

Research invisibility.

You get two new spells in this mission: invisibility and rain of fire. Used together, you'll be able to do a lot of damage to orc units. However, learning both spells and training the units necessary to use the spell is very expensive. You certainly don't need to research these spells to complete the mission.

The poison cloud attacks may come from across the river.

Here's the first poison cloud attack. The warlocks come in packs and will blast your northern-most building. Occasionally, they'll target your units. It's important to immediately move all units away from the cloud and redirect any units who might walk through it. Better yet, kill the warlocks before they get close to your base. The poison cloud lingers for a while and will severely damage your buildings, but you don't need to repair anything until the buildings are in the red.

Thankfully there's a bug that causes the warlocks to cast poison cloud over the river from time to time.

Guard the bridge.

As you hold the bridge, set up the standard archer trap. However, be vigilant and use the knights to destroy orc catapults before they tear apart your garrison.

The lower base is revealed.

Use far-seeing to uncover the orc bases. There's one to the south and one to the north. It's easier to attack the southern base first because there are less defenders. Also, with the southern base destroyed, you have the security of a third gold mine should you run low on funds.

Cast rain of fire to weaken the orcs (who cannot heal).

While optional, you can use the rain of fire attack to soften up the orc defenses. Then, mop up with knights. Keep a few clerics on standby to heal the knights.

Hit and run tactics are very effective.

If your conjurer gets harassed, summon scorpions and run. Keep your clerics and conjurers away from the town. The AI has a tendency to attack buildings, depleting your mana. In fact, once the main defenders are killed, just pull your spell casters back and return them to your town.

Crush the upper base.

Once the lower base is destroyed, move your units to the bridge directly south of the northern orc base. Set up your archer trap at the bridge. Now, you have many different options to destroy this base. I personally like to summon scorpions and harass the defenders. Remember that the orcs can't heal their units. So you can soften them up with scorpions first and then move in with your knights.

Friday, October 1, 2010

Human Campaign: Map 8

And now, we come to my favorite mission in the game: Medivh's Tower. It's more like Medivh's cave, if you ask me. The mission is completely linear and straightfoward, but requires a lot of unit management, MP conservation, and formation tactics. The enemies don't come at you one by one. They're spread out across the map as separate skirmishes that gradually become more and more difficult. Also, you go head to head against Medivh in the end after battling the daemon and the fire elemental in a tag-team match! That's just awesome.

Of course, this is classic Warcraft. Back then, Medivh's backstory hadn't been fleshed out yet. He didn't have an assistant named Khadgar and he didn't work with Garona. Medivh was just a crazy and evil wizard who opened a portal into the stygian abyss and summoned demonic orcs to destroy Azeroth. He needed to be destroyed and it was your job to do so. There was none of that 'guardian' stuff, no possession by Sargeras, no reincarnation as 'the prophet,' no Draenor, etc. Things were simpler then.

Let's start off by talking about the big bads. You'll fight skeletons, slimes, and spiders along the way. But nothing compares to these three enemies:


Fire Elemental: You'll fight four of these creatures in the mission, but thankfully not all together. They're extremely fast and attack by exploding. Their attack damages one of the units surrounding it, but it's hard to tell which one. Three explosions kills a knight. Two explosions kills everybody else. The last one you fight is paired with a daemon.


Daemon: Before the Burning Legion, there were these 'daemons.' Nobody knows where they came from or where they went after Warcraft II, but Medivh has one in his pentagram room. The daemon is the strongest unit in the game in terms of HP and attack.  He can kill your archers, footmen, and clerics in one hit. You'll need to use Medivh's corridors and your archers' long range to your advantage in order to minimize the damage.


Medivh: The big bad wizard himself will continuously summon spiders until he's out of MP. The spiders will eat through the door and attack you from time to time. Not only that, but he has an incredibly damaging fireball attack with a really quick firing rate and long range. It will definitely take all of your remaining troops to take him down.


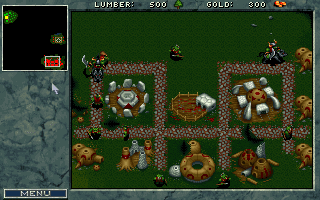
The map looks like this and your formation will be key. The numbers below correspond to each skirmish. It's important to enter each skirmish with the right formation and then completely heal all the units with your clerics afterwards. There is no time limit on this map, so you can take as long as you want.

1: Fire Elemental

Be careful of the explosions.

Send one knight to lure the fire elemental back to the rest of your knights. Have your cleric heal the knight that's being damaged by the fire elemental and you should defeat it with all of your knights intact. Continue to the very bottom of the map. You can leave your footmen behind if you want. They don't do anything in this mission until the very end.

2: Fire Elemental, 3 Skeletons

Muster your forces.

Set up a chokepoint at the bottom of the map. Archers in the back, knights in the front. Two clerics to prepare to heal the knights. Take one knight along the path and lure the skeletons and fire elemental back to your chokepoint.

The fire elemental approaches.

Once again, you should be able to clear them out with no casualties.

3: 9 Slimes

Set up your formation once more.

Proceed past the small room and set up another chokepoint at the tunnel. This time, you'll be facing some slimes. There are three slimes clinging to the bottom of the map and six more on the right wall. You can lure the slimes back to your choke point in two different waves.

Slime attack!

Once again, your knights might take a little damage, but nobody should be killed. Take your clerics and use far seeing on the upper right corner of the map. You'll uncover a den of spiders.

4: 10 Spiders

Spider attack!

These spiders don't run out of mana. Luckily, they're just as weak as the summoned spiders Medivh's been throwing at you. The way to them is unblocked, so just take four knights and clear out the den. Heal with the clerics and bring the rest of your troops to the spider den.

5: Fire Elemental, 3 Skeletons

Here comes another fire elemental.

Set up a formation just south of the spider den and lure the skeletons. The fire elemental might come too. If everything goes right, you won't lose any troops. Now all that's left is Medivh, a final fire elemental, and a daemon.

6. Fire Elemental, Daemon

Use the maze to your advantage.

At this point, the stupidest thing you could do is rush in and attack the fire elemental, daemon, and Medivh all at once. You haven't come this far just to throw it all away.

The knight will serve as a decoy.

Bring the rest of your units down to the walled area just outside Medivh's chambers. Don't break any of the doors. The goal here is to send a knight into the room with the pentagram and lure the fire elemental out. Then, while it weaves through the corridor, you shoot it down with archers. Sometimes, the daemon comes along. If that's the case, send all your knights at it to keep it away from your archers.

Beware the daemon.

If not, just repeat what you did with the fire elemental. The daemon is a lot tougher and might kill a few of your knights and footmen before you can bring him down. But in the end, you'll be left with a passable army against Medivh and his spiders.

7. Medivh, 0-12 spiders

Medivh is a formidable opponent with a very long range.

Depending on the situation, Medivh might have a huge swarm of spiders, or none at all. Remember all those footmen that did nothing? They'll run interference by giving Medivh some extra targets to shoot. Your remaining knights and archers should be enough to bring him down. Just make sure your footmen don't accidentally block the door and prevent your knights from getting close and personal. The mission ends when Medivh dies. If it doesn't, it means there's some spider, slime, or skeleton along the way that was missed.

Sunday, May 30, 2010

Human Campaign: Map 7

Now, we come to the most frustrating mission in the entire game. Before version 1.21 of the game, there was a glitch that rendered this mission impossible to beat without cheating. Even with the glitch fixed, the mission is still incredibly difficult. I'll elaborate further.

Your town lacks resources.

Basically, you start with no peasants, no barracks, and insufficient gold to train a peasant. Your goal is to attack the orc base, rescue a bunch of peasants (that have only a sliver of life remaining) and bring them back to your base. Then, the real battle begins.

The peasants can be felled by a single spear.

Here, you can see that the orcs are holding the peasants at the eastern edge of the map. This is right above the orc base. It's guarded by two grunts and one raider on the left and two spearmen on the right. You'll want to send your troops with the exception of one knight and one archer to rescue the peasants. The remaining knight and archer will defend your town from the orc raider and warlock that's coming your way.

Meanwhile, let's talk about the best way to rescue the peasants. There are two paths to the compound. You can either follow the road down the bridge and engage the compound from the left. Or you can hug the upper border of the map until you get to the upper right corner of the map and head straight down.

I recommend the latter approach because you can kill the spearmen first. Since the peasants have only a tiny sliver of life remaining, the can be killed in one hit by the spearmen. What you should do is lure the spearmen north and finish them with the knights. Then, bust open a hole in the wall and rescue the peasants while your knights and archers engage the grunts and raiders. You may need to lower your game speed to pull off the micromanagement.

Use your clerics to heal as many peasants as you can and send them to the northeast corner of the map. Then, send them back to your base along the upper border. As for your surviving archers and knights. Send them along the path, up the bridge and back to your base. Immediately send your peasants to work. Have half of them chop lumber north of town and the other half mine gold south of town.

The orc base.

What you see here is the orc base directly south of the compound. In all versions of the game prior to 1.21, all of the base defenders would immediately rush to your town and destroy it when you rescue or heal the peasants. This is due to an AI script being accidentally triggered which was originally meant for do-or-die dungeon missions. Some claim you can micromanage the clerics and survive with one knight remaining. But I've never been able to pull it off.

In any case, if your base keeps getting overrun by raiders and spearmen before you can get your peasants home, you'll need to patch the game. Otherwise, you're out of luck.

Venture south... carefully.

Whereas the red humans sent swarms of scorpions in the previous mission, here you'll have to contend with the warlock's spiders. They have the same HP, attack, and speed. But I like the satisfying 'splat' sound they make when they die.

Anyway, let's talk about terrain. There are three passageways separating your side of the map from the orc base: the lower left corner, the upper right corner, and the center bridge. The orcs most commonly attack from the center bridge, followed by the lower left. An attack from the upper right is rare, but it does happen from time to time. Mostly, they'll just park a necrolyte and warlock by the gold mine.

It's super important that you secure the center bridge with archers, knights, and a cleric. The bridge acts as a natural chokepoint so you can pick off the attackers one by one. It also give you a chance to build up your base without having to micromanage combat every thirty seconds.

Secure the choke points.

As you build up your town, secure the lower left passageway as well. You can use your clerics to reveal the rest of the map. There's more than enough gold on your side of the lake. So be sure to upgrade everything and build 2-3 barracks.

The orcs have been crushed.

The orcs will send waves of attackers but amass them just north of their base. The best time to attack their base is immediately after the most recent wave has been intercepted at the bridge chokepoint but before they've trained any reinforcements. If you attack at the wrong time, the orcs will defend with summoned scorpions and skeletons, making the battle much more difficult.

Otherwise, a combination of knights and catapults will win the day. As always, destroy the orc barracks first, followed by the temple and tower.

Next Time: Medivh's tower awaits

Human Campaign: Map 6

These next missions are the two most frustrating missions in the entire human campaign. If you can get past these, you can get past anything.

Northshire Abbey is under attack by rebels who wish to overthrow the crown. No, these human warriors clad in red aren't the nation of Stromgarde or some precursor to the Scarlet Monastery (although that would be cool). There's just a bunch of humans who decided to fight against you and give you the opportunity to not have to fight orcs for once.

Northshire Abbey is under attack!

The mission begins with Northshire Abbey under attack by two knights, two footmen, and two archers. The first thing you'll want to do is turn your game speed all the way to the lowest setting. Time is of the essence and depending on how many buildings they destroy, it will determine how difficult the rest of the mission is.

Your soldiers clean house.

Immediately start to train a peasant. You'll need one to start mining and there's no time to waste. Meanwhile, grab your starting units (four footmen, four knights, four archers) and send them to engage the rebels. There's nothing you can do to prevent the lumber mill from being destroyed. But if you're fast enough, you can save the blacksmith (barely) and the stables.

Secure the mine to the north.

The good thing about this map is there are a lot of gold mines. The closest one is immediately north of the destroyed lumber mill. Your peasant should be ready so start work on a second peasant and send the first one into the mines.

The enemy has conjurers...  you don't.

The enemy will attack from two locations: the north or the east. Not only that but they'll send swarms of scorpions to antagonize your peasants. Be sure to put your archers next to the mine so they can fend off the scorpions. The enemy conjurers like to stay outside your town to summon scorpions. So take your surviving knights and kill any that show up.

Evil humans.

Once you've built up substantial funds, you'll want to train a cleric and learn far seeing to spy on the rebel base. It's pretty well guarded. But the intel will be valuable because you'll be able to see if they've built catapults.

Your mine is depleted; time to move on.

Enemy catapults will be your worst nightmare in this mission. Luckily,  you can build catapults of your own. The location of the first gold mine (which might be depleted by now) is a good area to set up your defenses. The catapults and archers will kill any enemies that come from the north with the exception of enemy catapults. When you see the latter, use your knights to take them out. The eastern entrance to your base is your weak side. But the catapults you've stationed by the lake should be able to alert you to any attack so you can bring your knights down to intercept them.

Attack the enemy peasants to cut off supplies.

Eventually, the red base will run out of gold in their mine and start sending their peasants south. This is where you should send your forces.

Their mine is now yours.

You'll end up eliminating 10-15 peasants here. The red base will continually train peasants and you'll keep killing them. Meanwhile, you'll notice the scorpion attacks and catapult attacks slowing down.

The traitors fall.

The final attack on the base is just a full-on clash. Make sure you have at least eight knights and some clerics. Bring your remaining archers and catapults in. Then, just swarm the base.

Try to heal the knights with your clerics for as long as you can. Sometimes, the red base will be sneaky and send some troops to attack your base which is unguarded. If that happens, just finish off the red base and then send your remaining knights to mop up. Your town hall can take quite a beating before it falls and the red base loves to attack your farms first.

Saturday, May 1, 2010

Human Campaign: Map 5

Well, now. This mission takes you deep into Elwynn Forest, a location that should be familiar to every WoW player. Except here, you won't find wolves to grind or fetch quests to complete.

Here we go again.

This mission introduces the human knight, the fastest and strongest unit that you can train. To build a knight in your barracks, you'll need two key buildings: the blacksmith and the stables. So you won't be able to use them right away. Until you have a barracks, you'll need to rely on archers to defend your town. The footmen become obsolete and barring limited resources in a dire situation, you should never need to train them again.

Chopping the trees.

There are three mines near your town. And by the end, if you plan to research everything, you'll need all three. The closest mine is directly south of town and is blocked by trees, forcing your peasant to walk all the way around. Set your peasants to chop a path through the trees.

Set up a wall of archers.

As you explore with your knight, you'll see that the map is divided by trees into two distinct halves. There's a tiny opening where the orcs cross over to your side of the map. Set up archers to put an end to the orc raids.

The clerics reveal the orc stronghold.

The church now allows you to research holy vision, which reveals the shroud piece by piece. You'll find the orc town at the top-left corner of the map. It's guarded by numerous spearmen and raiders. As you reveal more shroud, you'll see that the orcs love to cluster units near the barracks before sending them to their death at your archer wall.

The spearmen standing at the road intersections are default town defenders. This means if they die, the computer won't replace them.

The orcs have a cluster of spearmen.

South of the town, you'll find a group of spearmen. The trick to get rid of them is with a set of knights. Grab some knights to incite the spearmen. Then, pull them back so your archer wall can help the knights take them out. Heal with your clerics.

The archers make short work of the orc melee units.

Repeat this to kill the raiders, necrolytes, and town guards. Eventually, the town will only be left open to attack. By this time, both gold mine should have collapsed. So send your peasants to the mine at the lower left corner of the map.

Attack!

All you really need are four knights, any surviving archers you have, and your clerics. Send everybody into the orc town and start trashing things. The orcs may have a few raiders or grunts scattered around the mine. So concentrate the knights on the raiders and use your clerics to keep healing.

The humans triumph over the orcs.

You should end up with a few surviving troops when the battle comes to an end. Hopefully, you've been training more knights back at your town and can send them in as reinforcements. In the town, destroy the orc barracks first to stop orc reinforcements. Then, take out the temple to stop necrolytes from being trained. After that, destroy the town hall and place a unit on the ruins so the peons can't rebuild. The rest is easy.

Next Time: Northshire Abbey gets attacked by some evil humans dressed in red. No, not Stromgarde.